Update: The next post in this series is up, IP Camera, Home Security and Automation Update.
In my last post, Amcrest IP Camera First Impressions, I went over what I’d found about the pair of IP cameras that I bought to keep an eye on my dogs and my new house. My next step was to figure out how I’d handle motion-activated recording, and that’s what I’ll discuss this time. I’ve spent all of my spare time in the past week - probably twenty to thirty hours - researching and experimenting and the results have actually been quite surprising.
Initial Requirements
The initial requirements that I identified were:
- Open source (preferably GPL) and runs on Linux
- Must be able to run with low-end hardware - either a Raspberry Pi or another small and inexpensive system (I don’t want this to depend on my desktop, and I don’t want to invest a lot in it)
- Support multiple cameras - at least two, ideally four or six
- Works behind a HTTP reverse proxy, such as nginx with certificate auth
- Can stream live via the UI, ideally full resolution with low latency
- PTZ (pan/tilt/zoom) control from the UI
- List, search and playback videos from the UI
- Decent mobile support, either via built-in web UI or native app
- Motion detection to trigger recording and notifications/scripts; configurable post-motion recording time; prerecord buffer
- On-demand manual recording (ideally via both UI and script/API)
- Ability to disable motion activation/recording via script or API
- Detect loss of video/tamper and trigger notification
- Detect loss of camera (on network) and trigger notification
- Relatively straightforward monitoring (i.e. I should get a text message if the system goes down or stops working correctly)
- Bonuses:
- Runs in Docker, even if not officially supported
- Written in a language I have some experience in (which essentially means Python, Ruby, or maybe (maaaaybe) NodeJS)
- Only uses HTTP
- Nice multi-camera view
Contenders
Right away I knew two of the projects I wanted to look at: ZoneMinder, which I’ve heard many people mention and seems to be the de-facto standard in open-source video surveillance, and Motion which I’ve used before and only knew as a limited and somewhat archaic daemon. After some investigation and reading of feature lists, I came up with two other, much newer, contenders in Shinobi and Kerberos.io. I saw a few other possibilities online, but they didn’t fit the above criteria.
I did all of my initial tests in Docker since I was testing each of these on my main computer and didn’t want to clutter up the system, and I also really like using Docker for testing and deployment of software. That may be unfair for some of them, but it’s both how I intend on deploying the final choice and my preferred deployment strategy lately in general. I can’t say that I dove deep into all, or even any, of these options but I gave each of them at least four hours (and quite more than that for some of them) of experimentation. I expect to be able to get something at least minimally working within that amount of time.
ZoneMinder
ZoneMinder seems to be what everyone talks about when the topic of Linux-based open source surveillance software comes up. It’s an incredibly mature and long-lived project - first released in 2002 - and for a long time seems to have been the only option. It’s probably most famous for allowing the user to select various “zones” (regions of the image) with different motion detection sensitivity levels, including completely ignoring certain areas. When I started actually looking into it, though, my expectations decreased significantly. During my testing the first problem I found was that, while Docker is now a recommended installation method, all of the official Dockerfiles and most of the others that I could find run it in a single super-container with every process, including MySQL and all of the web tier (which ends up being 20-something processes). This is extremely un-Docker-like, and horribly inefficient for me since my test system (my desktop) already runs MariaDB for a number of other applications. The official Dockerfiles are also based on a full and bloated centos:7 image (73 MB just for the base image). Lastly, and most shocking to me, while Docker is an officially-supported installation method the project doesn’t actually distribute Docker images. While ZoneMinder has packages for Ubuntu, RHEL, Debian and Gentoo, their Docker-based installation instructions build the image locally which almost completely obviates the entire purpose and idea of Docker as a build-once, run-anywhere packaging format.
After some investigation, I was able to find Philipp Schmitt’s docker-zoneminder repo which provides an Alpine 3.4-based ZoneMinder image. Unfortunately it includes MySQL and doesn’t build anymore (the last commit was two years ago), but I forked the repo and was able to get it to build and run on the latest Alpine Linux 3.7 with the distro’s official zoneminder package. That took me a mere three days, which included giving up on Philipp’s use of lighttpd and switching to Apache httpd 2.4 configured according to ZoneMinder’s upstream instructions. Let’s just say that the process was anything but easy. I eventually got ZoneMinder working, but didn’t even get as far as setting up motion detection. I attempted to tell my ONVIF-compliant Amcrest ProHD camera to pan right using ZoneMinder’s builtin ONVIF control support, and my entire machine locked up for about an hour (note this is an Arch Linux desktop with a 4-core/8-thread (HT) Intel i7-3770 at 3.4GHz and 16GB of DDR3 memory). Even before that just watching the live streams of my two cameras (1920x1080 and 1280x960) at 15fps, with motion detection and recording and all other features disabled, would result in them regularly dropping to 1-2 fps for a minute or two.
After the lockup caused by ONVIF support, I went about setting up resource constraints on memory and CPU usage for the container. That was the final straw; no matter what I set the constraints to, even values far in excess of the maximum of what the container was actually using, ZoneMinder seemed to behave horribly. I tried setting the memory limits to 12G (75% of my system’s memory, when the container was only using ~512MB) and the CPU limits to a period of 100000 and a limit of 700000 (allowing it to consume 7 of my 8 threads/virtual cores) and it still performed as though ZoneMinder was crippled. Given that my target platform is a Raspberry Pi (3 B+ with 1.4GHz 64-bit quad-core ARM Coretx-A53 and 1GB LPDDR2 memory), I figured it was time to stop my ZoneMinder experiments. I know people and have heard many positive stories about ZoneMinder, and work with a few people who use it and find it to be great, but I think it’s just capable of doing too much - and has too high resource requirements - for my needs.
In the interest of transparency, here are some of the notes I wrote down during my attempt at an Alpine-based Docker container:
- As a preface, I need to mention that ZoneMinder was first released in 2002. It is a mature, even aged, piece of software. The level of effort that has gone into it is astonishing, and the mere fact that it’s still an active and well-respected project after 16 years is pretty damn amazing, even more so for an open source project. That being said, two of my main criteria for selecting home security/surveillance software are how stable I think it will be (will it run for weeks/months without me even looking at it, and be working when I need it to) and how easily I can customize it (code).
- ZoneMinder is a giant codebase made up of Perl, PHP, C++, JavaScript, and probably some others. There are just so many moving pieces (see the Components documentation) that I can’t really imagine this running reliably without intervention for terribly long.
- As a corollary, when I did finally get this running, the logs (written to the DB and shown in the UI) kept reporting Errors (in red nonetheless) for processes that died and were then respawned by the watchdog without any noticeable effects in the UI/streams. I don’t want to take on a system that doesn’t even know the difference between an error and a warning, or that reports errors (with whistles and bells and sirens) to the user that it can self-recover from. I intend on leaving this alone as a security system, and need to be able to reliably tell (and programmatically alert on) whether it’s “working” or “not working”. A process dying and being successfully restarted a second later isn’t what I’d call an “error”.
- Apparently Docker is now a recommended install mathod, but the official Dockerfiles (and almost all of the others I’ve found) are decidedly un-Docker-like, running everything including both the web and DB tiers in one container. Given how many components make up ZoneMinder, it seems like it would much more naturally be made up of a handful of containers - maybe half a dozen plus a container per camera.
- Even on my main desktop computer - a relatively beefy machine for its day, with a four-core/eight-thread Intel i7-3770 @ 3.4GHz and 16GB DDR3 - ZoneMinder seemed to be struggling with two IP cameras and I saw occasional framerate drops down to one to two fps. It just seems to be trying to do too much.
- I still think there’s a ghost in the machine re: docker resource constraints. Once I set CPU or memory limits on the container, even if I set them way (i.e. ten times) above what Docker reports ZoneMinder to be using, ZM behaves differently and starts to have crippling performance issues.
- Bottom line: I do a lot of work with Docker, and automating deployment and monitoring of software has been a big part of my job for the last decade. I need something that’s simpler, feels more reliable, and is easier to deploy and monitor. Something that logs to STDOUT/STDERR, looks at least something like a 12-factor app, and feels like it can actually run (if not be designed) natively in Docker.
So after three or four incredibly frustrating afternoons and evenings, I put ZoneMinder aside and continued down my evaluation list.
Postscript: One of my colleagues, Jason Bruce, told me that he uses the aptalca/zoneminder-1.29 Docker image to great success. If you’re considering ZoneMinder, it’s probably worth trying that image, and it’s only 310MB.
Kerberos.io
The next candidate on my list was Kerberos.io, one of the newcomers that I’d never heard of before. It’s billed as a “free [and open-source] video surveillance solution, which works with any camera and on every Linux based machine. You can deploy a fully configured video surveillance system within a few minutes on the environment you prefer: Raspberry Pi, Orange Pi, Docker, etc.” So that caught my attention as it seemed to check a lot of the non-functional boxes - Docker, modern, etc. - right in the introductory “advertising”. The website also looks clean and modern, and the screenshots and demo look nice. The one negative instantly apparent is that it only supports one camera unless you use the paid and hosted Kerberos.cloud product, but I figured that I could either run the cloud software myself or else hack something together (their docs on Multi-Camera Docker are essentially just how to run multiple instances, one per camera).
On the positive side, Kerberos.io was incredibly easy to get running. The docs just point to their public images on the Docker Hub and a github repo with a docker-compose.yml that runs the appropriate containers (one for the “machinery” capture backend and one for the “web” frontend), and even has an ARM-specific Dockerfile for Raspberry Pi users. Setup was a complete breeze as the web UI starts out with an installation wizard that walks you through configuring the app. After setting up a user I was able to log in and click the “Configuration” button on the top menu bar and configure my camera. It was quite straightforward - just select “IP Camera” and specify the RSTP URL, dimensions, delay (zero) and live stream framerate, click save, and view the camera. I had a UI showing the stream from my 1080P camera and the ability to record within about two minutes. The UI initially loads to a dashboard with the live camera view and some graphs of motion detection metrics by hour of day, day of week, and today vs average, as well as a listing of dates (presumably motion detection history/recordings) on the left sidebar. There’s also a handy “System” video that shows uptime, some system information, the currently-running Kerberos.io versions, statistics on captured images, and some system performance information (disk space that was incorrect in Docker, network IO, and CPU usage).
Unfortunately, the system almost instantly showed a “Hey, your disk is almost full. Please remove some images..” header at the top of the pages. Yes, with the containers running, my /var partition was 97% full (lots of churn lately, and lots of cruft from the ZoneMinder tests).
At this point I went back to “Configuration” and clicked the “Motion” button to set up motion detection. I was presented with a gray box that I assume was supposed to show the live image from the camera, and some points on a polygon to select a motion detection region. I did the best I could with the missing image and moved on to some sliders for “sensitivity” (default fifteen on a scale of zero to thirty) and “number of detections before valid” (default two on a scale of zero to ten) and then configured the recording settings: both images and video, no timestamp overlays, fifteen frames per second (the same as the cameras), record five seconds after motion detection, and nothing set for the options to trigger webhooks, scripts, GPIO or MQTT on detection. I should note that the “seconds to record” field is a slider for “The number of seconds that will be recorded after motion was detected”, which defaults to five and can go from zero to thirty.
I confirmed those settings and browsed back to the Dashboard, where I could see the live video view and… a whole lot of nothing else:
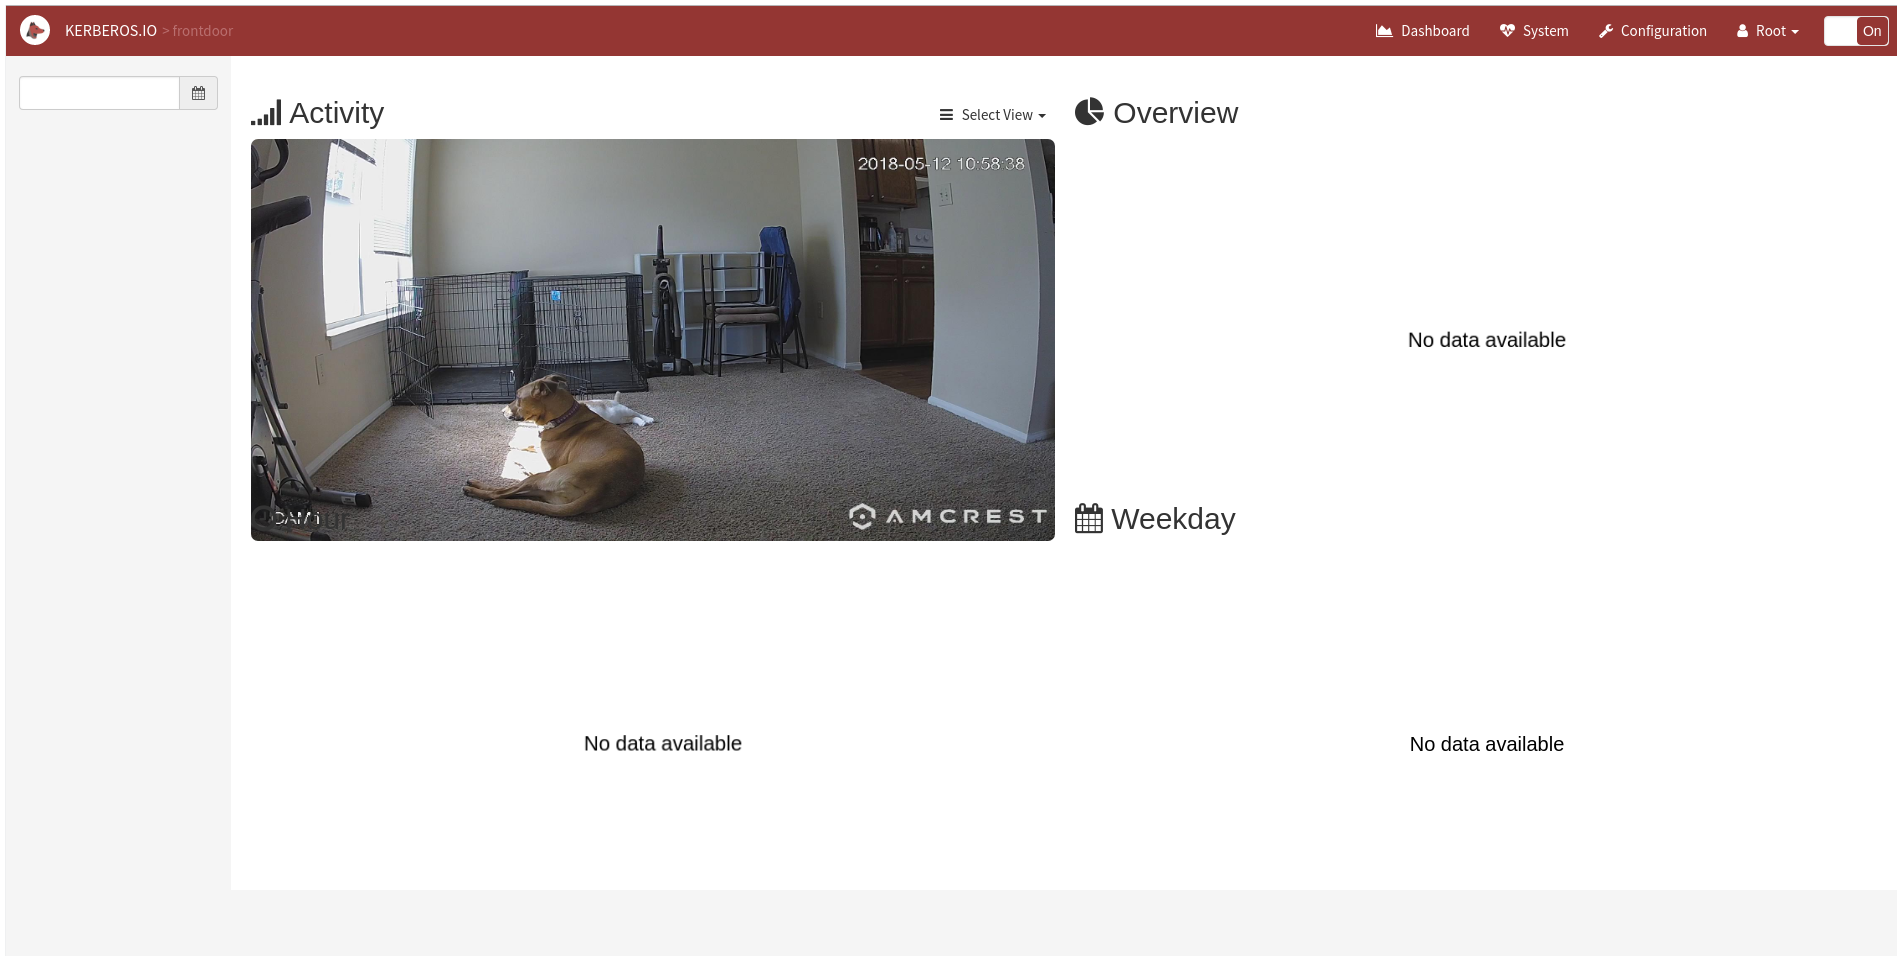
Refreshing the page didn’t seem to help get any of the other data to show up, even when there was obviously motion. There’s a Heatmap feature in the Configuration page, but I haven’t been able to get it to display anything other than “No data available”. Thinking that something was wrong, I went back through the motion detection configuration and found that the region I’d selected was reset back to the strange-shaped default. I fixed it, pressed the “Confirm and Select” button without going through to the second and third screens of the Motion configuration dialog, and then opened the Motion configuration dialog again. This time, the region was effectively empty (a flat line in the top left corner, with multiple points on it) but I could actually see the camera stream albeit frozen at the latest frame. I adjusted the region polygon again, Saved, and then reloaded the Motion configuration dialog… and got back to a correct-looking region but no picture. I assumed that was right and proceeded back through the three screens of the dialog and found the rest of my settings back to default. Through trial and error, I found that the configuration dialog for the Motion detection has three screens, which are paged through by using either left/right arrows on the sides of the dialog or one of three small circles (inactive two grayed out) at the bottom of the settings. Apparently, while the “Confirm and Select” button dismisses the dialog, it only saves the settings on the current one of three pages. So eventually, I realized that I had to edit the first page, save, bring the dialog back up, move to the second page, save, then bring the dialog back up, move to the third page, and save. I then needed to press the “Update” button on the main Configuration page to commit my changes.
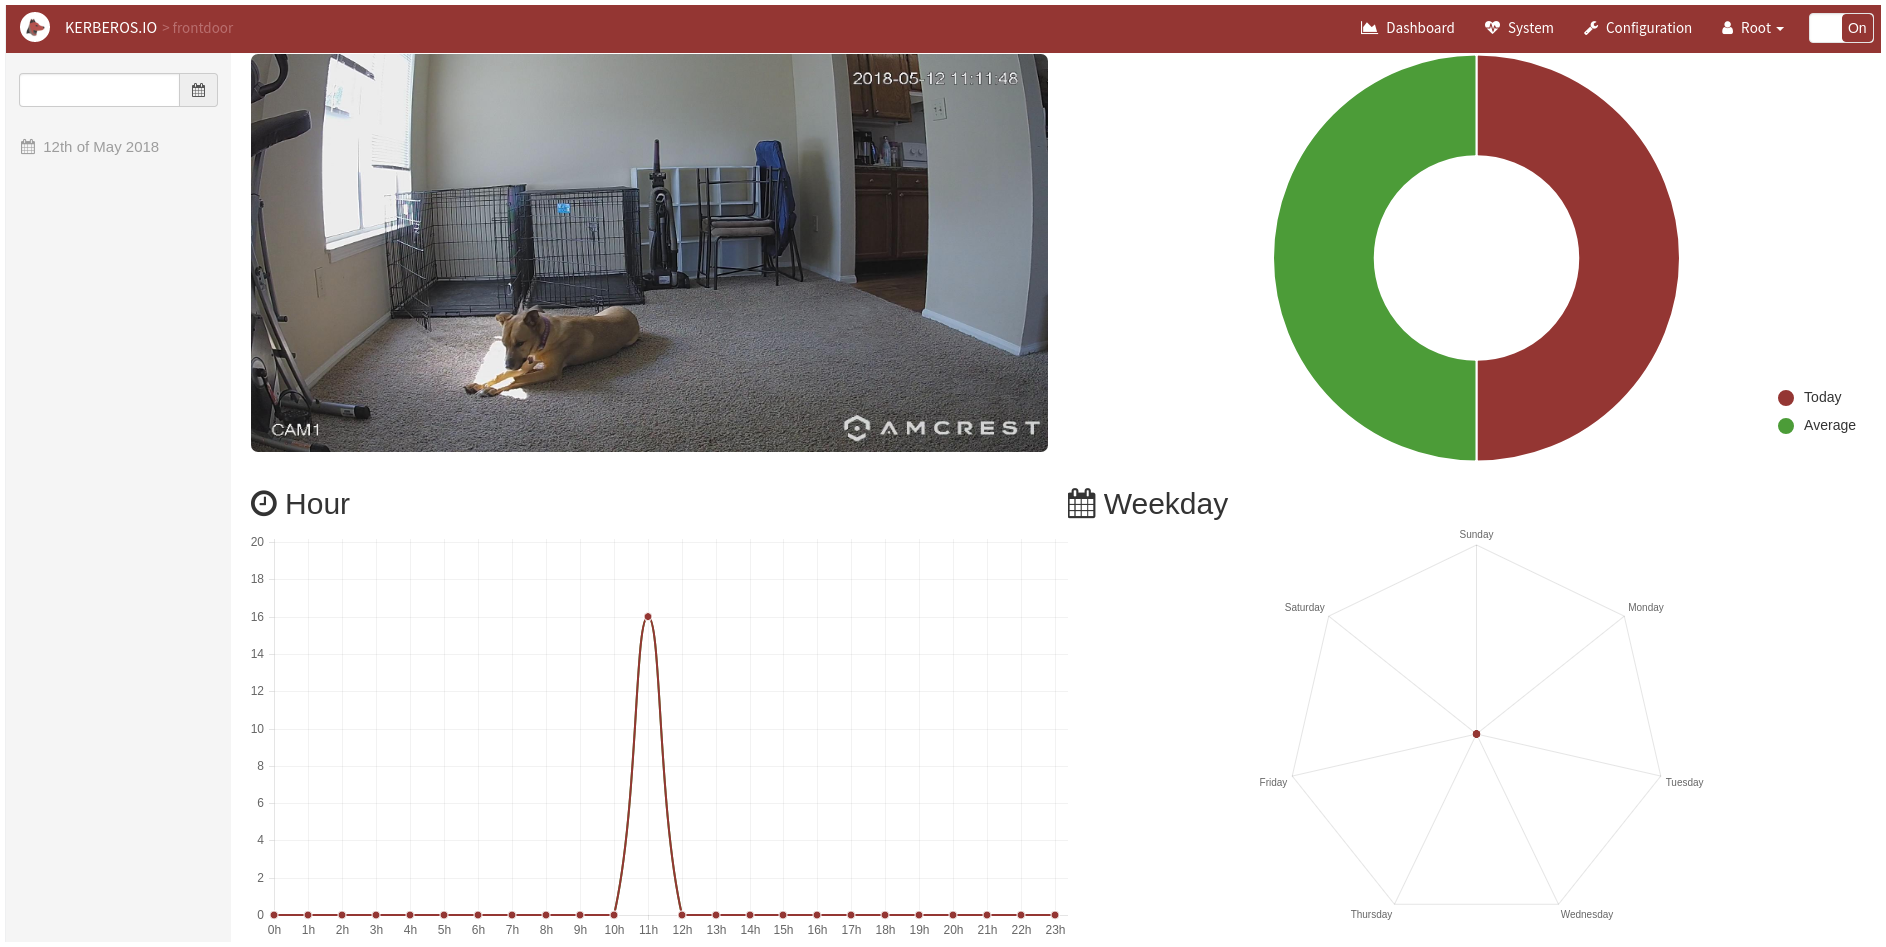
After all that, things seemed to be working. Navingating back to the Dashboard showed some actual data on the graphs including a large number of detections for the current hour:
However, when I clicked on the date in the left sidebar, something seemed to be very amiss:

The main Dashboard had reported 18 detections, and the slider bar on the view for today’s date (above) clearly showed some heatmap colors for the current hour, but it was also telling me that it couldn’t find any detections (videos/images). On a hunch I looked at the Docker logs for the container, and found the “machinery” (capture and storage) container’s logs full of this, repeated over and over:
machinery_1  | Cleaning disk
machinery_1  | Cleaning disk
machinery_1  | rm: missing operand
machinery_1  | Try 'rm --help' for more information.
machinery_1  | Cleaning disk
machinery_1  | rm: missing operand
machinery_1  | Try 'rm --help' for more information.
As best I can tell, it was detecting that the disk backing the Docker volume was 97% full (it’s a 100G volume) and cleaning up the disk… which apparently meant deleting all of the recordings, including the ones that had just been made and I hadn’t reviewed yet.
That was the end of my experimentation with Kerberos.io. Not only was it apparently executing a shell command (rm) with invalid/missing arguments, but it was also deleting all of the recordings it had because the disk was 97% full. First and foremost, the camera I’m using is streaming 1920x1080 H.264 at 15 frames per second; 3GB of disk space remaining shouldn’t be a reason to delete all of the five-second video clips unless the cleanup logic is purely based on percentages. I didn’t dig into the source code, but I’m pretty sure if my 100-Petabyte disk was 97% full, it would still start deleting single-digit-megabyte images to free up space. Secondly, and more importantly, I intend on using this as part of a security system which to me means engineering for the worst-case scenario. Under normal circumstances, I should be able to respond to a low disk warning and manually free up some space. My Internet connection is generally very stable, so the “worst case” I want to engineer for is someone burglarizing my house and being smart enough to cut the cable line. If that happens, causing storage to fill up, the most important video is actually the oldest! It’s the video that was recorded closest to when I lost access to the system. In which case, I’d want the failure mode to be either filling up the storage or ceasing to record, but definitely not to arbitrarily delete old-but-unreviewed recordings.
Shinobi
Aside from my old standby of Motion, the last candidate on my list was Shinobi. Shinobi’s tag line is “The open source CCTV solution” and prides itself on being modern and using modern technologies. The first section of their pretty and modern homepage, https://shinobi.video/, includes a link to the docs and GitHub and states:
Shinobi is Open Source, written in Node.js, and real easy to use. It is the future of CCTV and NVR for developers and end-users alike. It is catered to by professionals and most importantly by the one who created it.
After seeing what’s happening under the hood of ZoneMinder, this certainly got my attention, as did the general modern open-source community feel of the site. Granted, I initially missed the section comparing Shinobi CE (Community Edition; GPLv3) and Shinobi Pro (Professional but free for non-commercial use; Creative Commons) and that Community Edition is “updated only for major changes or bug fixes.” But the current features list includes most of what I wanted (even audio recording too, from my ProHD)
First I headed over to the Dockerfiles from Shinobi’s author. I had some issues with the Alpine-based vatiant and decided to give the Debian ones a try. One docker-compose up and some patience later, I had two containers running: camera and cron. I immediately hit the web port and got a login box, which confused me with invalid logins for a while until I went back and re-read the installation docs and realized that Shinobi supports multiple users, and I had to login via /super (superuser) to set up a user account for myself. I did that and logged in as a regular user, and was greeted with a clean, modern, responsive UI.
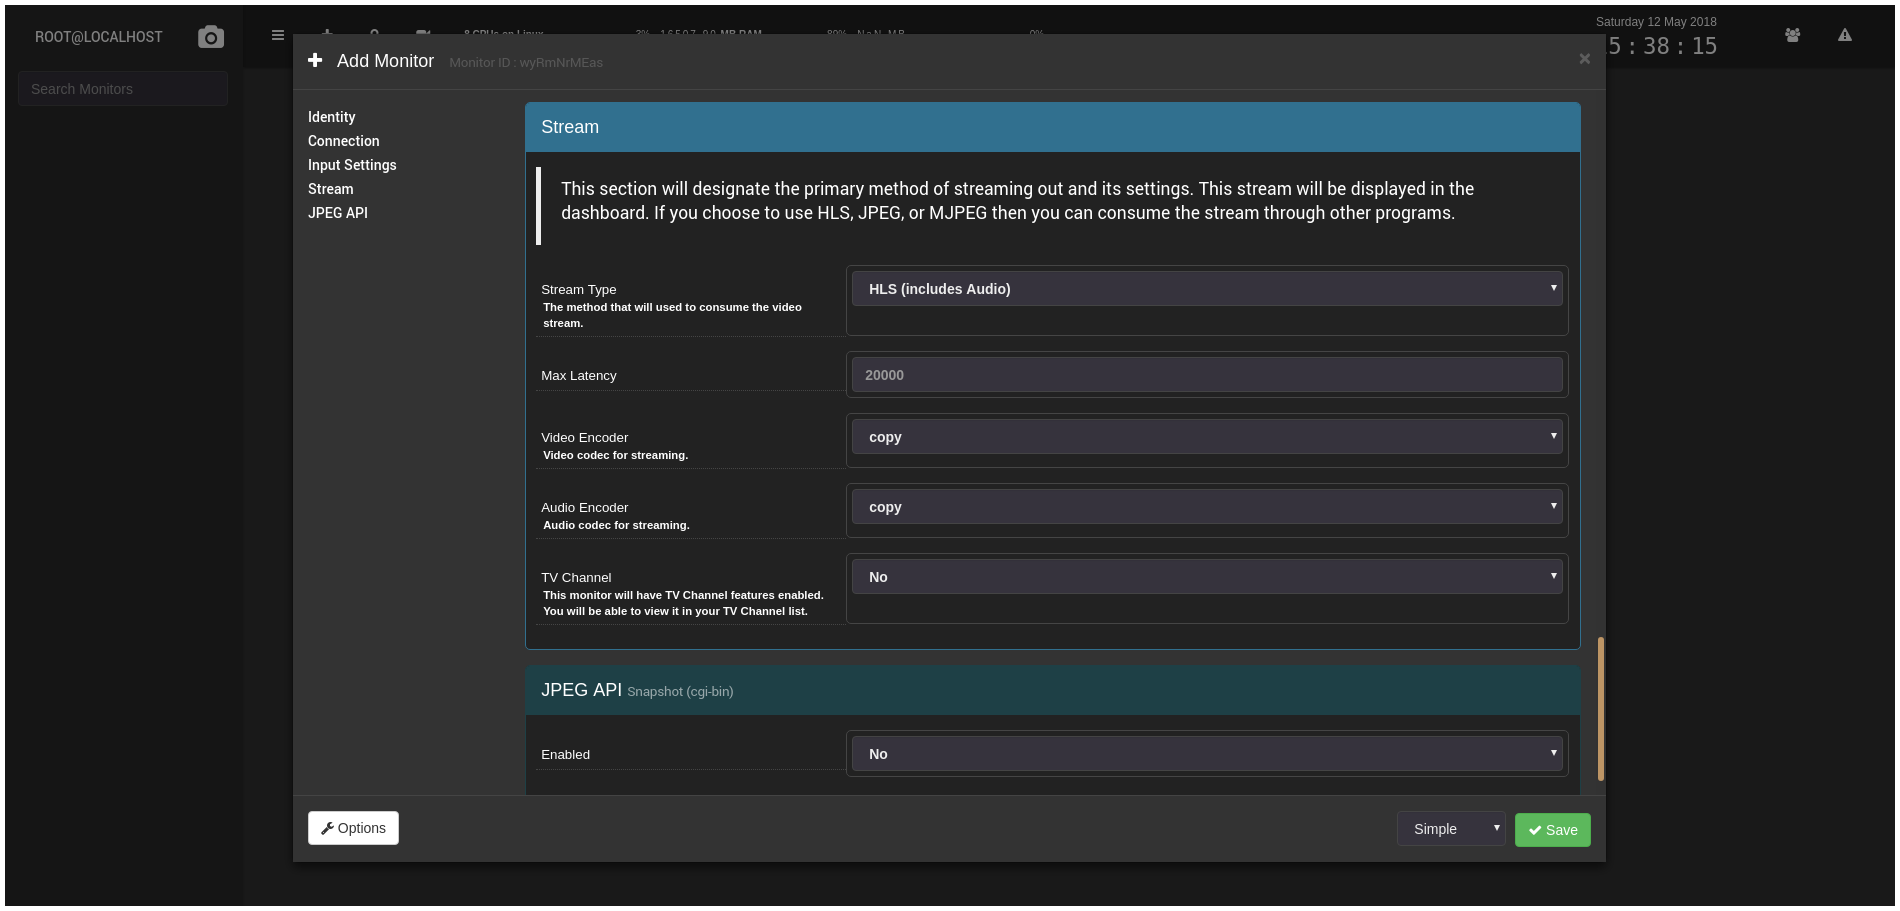
Not being one to read documentation for end-user software, I muddled around in the UI a bit until I managed to add my two cameras. It wasn’t terribly difficult: click the “+” icon in the top left of the UI (tooltip says, “Add Monitor”) and fill out the form. One early problem I had adding the first camera is that the URL parsing discards query strings. I added my Amcrest ProHD with its primary stream URL, which has a path of /cam/realmonitor?channel=1&subtype=0. The stream didn’t work and when I went back into the settings to edit it, the query string had been discarded. I just changed the “Automatic” (parsing of URL) to “No” and manually entered the protocol, host, port, authentication and path details myself, and it worked fine. Shinobi has a very nice interface for adding cameras, and one of the things I liked the most was the ability to choose the streaming details for the live stream; it supports Poseidon, JPEG, MJPEG, FLV, HLS (with audio) or a custom base64-over-websockets. The HLS stream also allows selection of video and audio codecs including copying the source codec (which is what I did). There’s also an option for a CGI-style JPEG snapshot API.
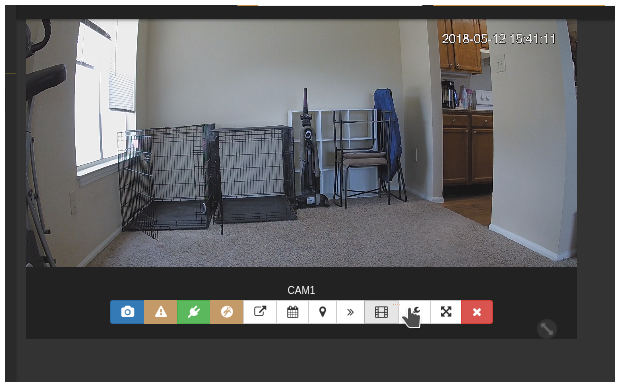
The UI is smooth and modern, with a fully responsive design that apparently works on mobile too (though I didn’t test it). It even includes nice dropdown menus and mouseover menus for streams that include snapshot, start/stop recording, pop-out, recording list, calendar of events, monitor/stream settings, and fullscreen. It also includes something called the “Power Viewer” that I’ll discuss later.
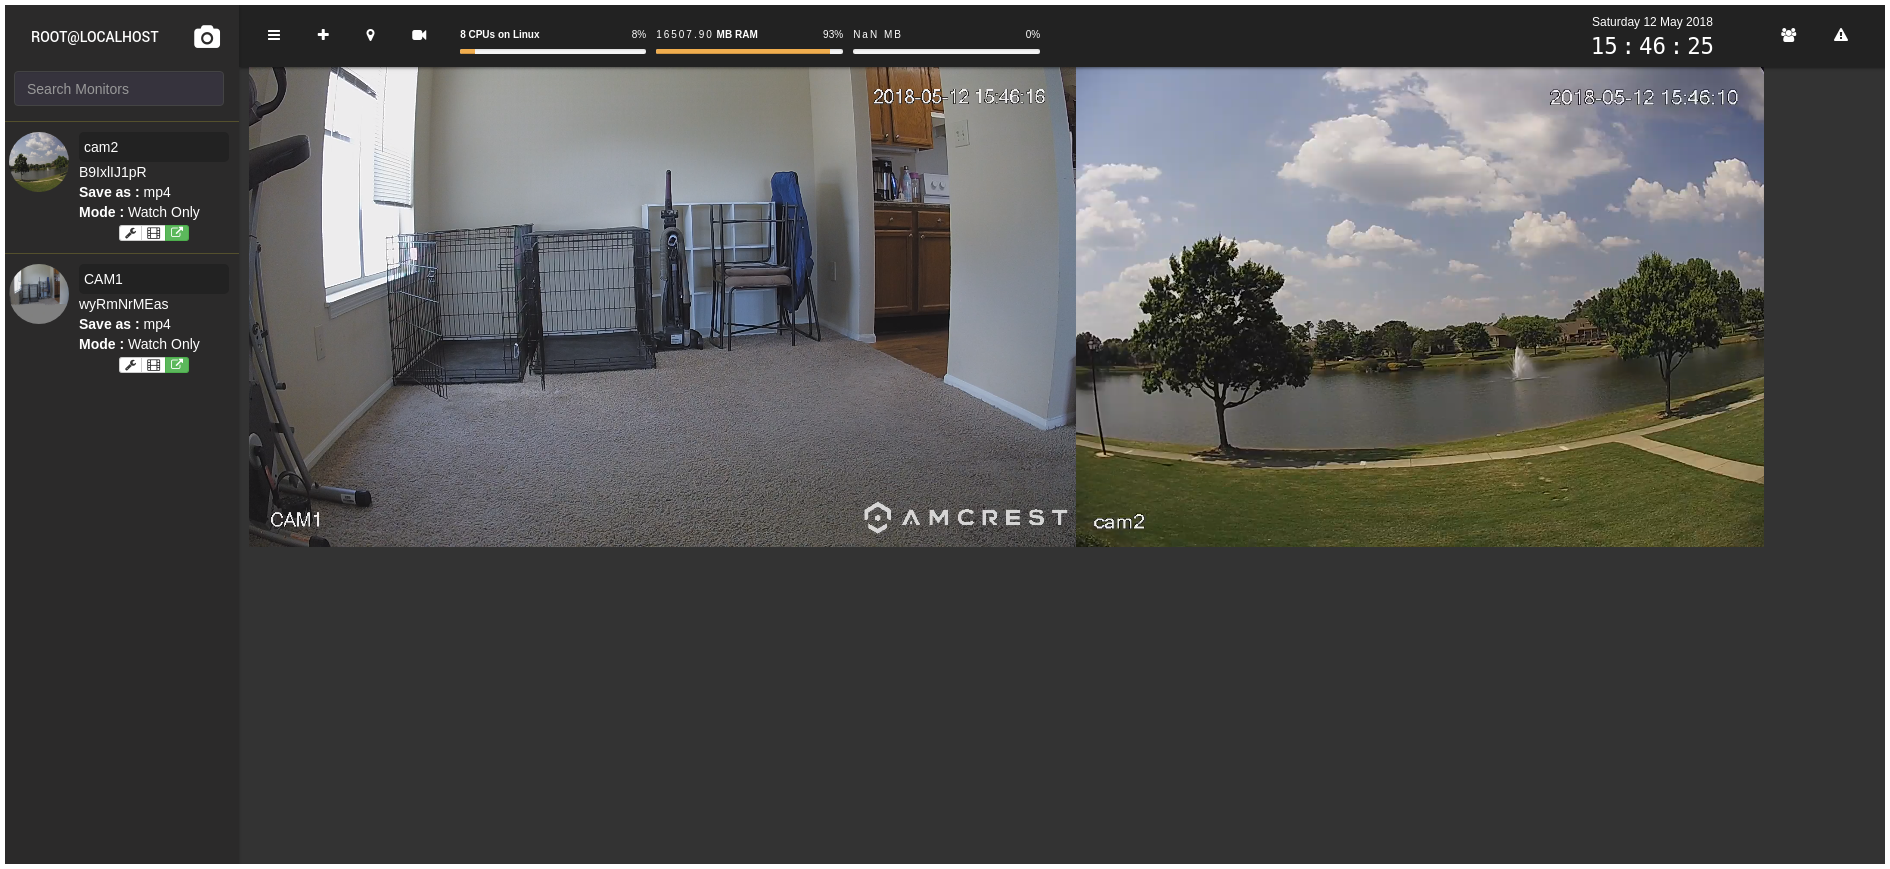
Within a few minutes, I had both cameras up and running with their full resolution H.264 RTSP streams (1920x1080 and 1280x960, respectively) at 15fps. The camera streams are shown by clicking on the camera in the left sidebar, and the stream windows can be resized by dragging the lower right corner (though it doesn’t keep the aspect ratio) and rearranged via drag-and-drop.
I was happy to see that, in this configuration with video streaming but not being analyzed, the Docker containers were only using a combined total of about 5% of my CPU and 100MB RAM. I tried some experiments with snapshots (they force-download) and manually-requested recordings and was quite happy with both. I did have some occasional issues with live streams freezing if I refreshed the page, but they resumed fine if I logged back in. The calendar interface seemed handy - it shows a monthly calendar with the time, camera name, and size of each recording for each day - and the videos list for each camera lists the start and end time, filename, and size of each video for each camera, along with buttons to preview (on the same dialog), watch (fullscreen-ish in the viewer), download, and delete.
This all seemed wonderful, so I figured it was time to enable motion detection. Well… little did I know that would be a six-hour struggle. The documentation on Motion detection is separate, and states that motion detection isn’t built-in because not everybody wants it and it has dependencies, which is also started at other places on their site. The first section on the Motion detection docs page says that it’s now built-in and people should just use that, but is rather easy to miss (the section heading is at the same level as “Install on Ubuntu/Debian”, “Install on CentOS/Fedora”, etc.) and doesn’t explicitly say whether there are external dependencies or not. Without going into the details, I went through a six-hour marathon of trying different Docker images, installing dependencies, running NodeJS scripts, starting other processes, adding containers, etc. in an attempt to get motion detection working.
Through the course of this I found that Shinobi’s documentation is quite lacking, and also that it seems to be sporadically updated. The settings documentation contains a lot that doesn’t seem to line up with what I’m seeing in the UI, and I’m not sure if it’s because the docs are out of date or because they’re ahead of the code, or a Pro vs Community Edition issue, or what. There are other places in the docs that seem horribly outdated, and many sections that seem to give conflicting information.
At one point I also stopped and tried to configure pan/tilt control, but couldn’t find a setting for that either, so I went back to motion detection.
Most of my frustration was based on the Motion Detection documentation page and its statements that once Motion Detection is set up you should see “Detector: Motion Connected” in the Monitor Settings, and have configuration options for motion detection. No matter what I tried - Debian or Alpine, different images, adding packages and OS-level dependencies, restarting the services, trying the older, no-longer-recommended plugin-based method - I couldn’t find or see the Motion Detection settings like the docs said I should. I just kept trying different things to get those settings to show up. When I was just about to give up and was searching through Shinobi’s forums for some confirmation of whether anyone could get this working, I stumbled upon a forum post that mentioned something about “Advanced settings”.
I started the containers back up and sure enough, in the far lower right corner of the Monitor Settings dialog, colored almost the same as the background, was a button that says “Simple” and has an arrow. I clicked it, selected “Advanced”, and suddenly the left sidebar of the dialog grew… to include Global Detector Settings and Control, among other options.
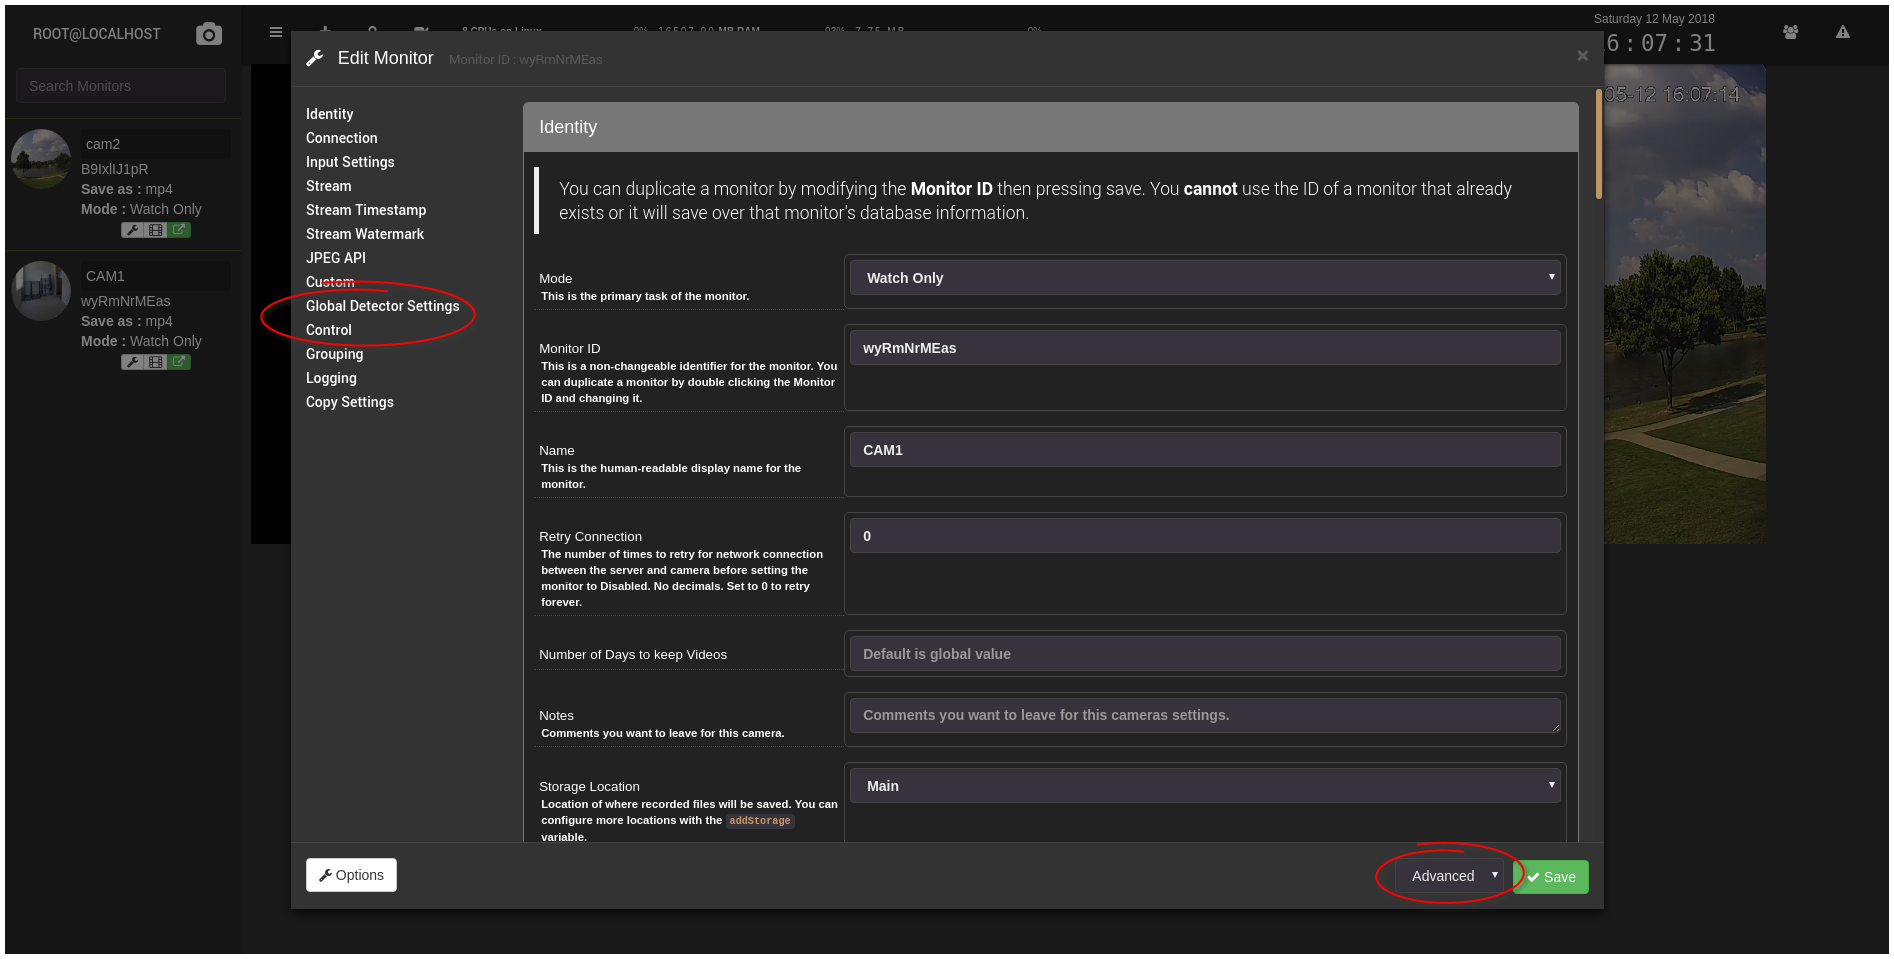
As far as I can tell, motion detection was probably working the whole time and my six-ish hours of struggling were all for naught. The only problem I had was not changing the Monitor Settings dialog from Simple mode - which hides all motion detection and control settings - to Advanced. I’ve gone back over the documentation multiple times, and there’s not a single occurrence of the word “Advanced” on the Motion Detection page or the Settings page, and certainly nothing telling users that they need to explicitly switch to Advanced Mode to see these settings.
At that point, I was already quite frustrated with Shinobi and felt that if this was at all indicative of the quality of documentation and user experience, I should definitely avoid it. But I at least wanted to know what its motion detection could do.
The settings documentation for Motion Detection was mostly straightforward, with the exception of a few settings:
- Recording Timeout - “The length of time “Trigger Record” will run for. This is read in minutes.” Apparently when Shinobi detects motion it records minutes of video, with a minimum of one and a default of ten. This was very strange to me, especially since many motion events that I’ve seen only span a few seconds.
- Timeout Reset on Next Motion - “If there is an overlap in trigger record should it reset. No: Finish the current 10 minute order.. Yes: Reset the timer”. I didn’t have to worry about this since it wasn’t visible in my version.
- Save Events to SQL - “Save Motion Events in SQL. This will allow display of motion over video during the time motion events occured [sic] in the Power Viewer.”
- Indifference - “How much Shinobi doesn’t care about motion before doing something. The opposite of sensitivity; a lower number means it will trigger sooner. The value ranges up to 15(+) decimal places. 10 is default, 0.005 is pretty sensitive to motion changes. Note: If using Region Editor, leave this blank, and set indifference in the Region Editor (below).” So… firstly, the semantics of this are awful. Secondly, in my version, the global default (if not using Regions) isn’t 10 it’s 0.5, and the per-region default is 0.0005.
There were also a number of settings visible in the UI for the version I was running (https://github.com/ShinobiCCTV/Shinobi.git “dev” branch 4bf071abb5706f9240f32617bf3bb4b8aa52f3ca) that weren’t in the documentation:
- Allow Next Trigger - “in Milliseconds”, default 2000.
- Send Events to SQL - “Save Motion Events in SQL. This will allow display of motion over video during the time motion events occured [sic] in the Power Viewer.” As I found out later, the Power Viewer does barely anything without this.
After configuring the detection settings, the documentation told me that I had to add regions (zones) or else the detection would use the full frame. I did that via an editor modal from the Monitor Settings which allows adding multiple region polygons to the video via a simple but somewhat jerky and annoying (drag too close to the edges and points won’t stick there) polygon editor. It was supposed to show the live video stream under the polygon, but that only worked once or twice for me, usually being a brown box where the video should be.
I was happy to see that running almost-full-frame, 15fps motion detection on both video feeds was only using about 400MB RAM and the equivalent of one core (on my host OS it showed all 8 cores running around 20%, which is pretty good since I was also running graphite, grafana, nginx, apache, MySQL, Chrome, Atom, etc.).
One thing I immediately noticed after enabling motion detection, though, is that there’s no UI indication of motion events. To see motion events for a camera, you need to use the Calendar, Video List, or Power Viewer modals. The other thing I noticed immediately is that using the default “indifference” value, my outdoor camera was recording constantly. I tried adjusting this value on both cameras but it certainly wasn’t scientific; the default indifference for a zone was “0.0005” so I tried increasing it (decreasing sensitivity) by powers of 10. The best I could get that way was a point where almost everything was recorded, and then another point where it never triggered.
After that experience, I turned to the “Power Viewer” which seemed like it might be able to solve this. The layout actually seems quite well done and useful, despite the fact that the Live View of the camera was only sporadically working for me.
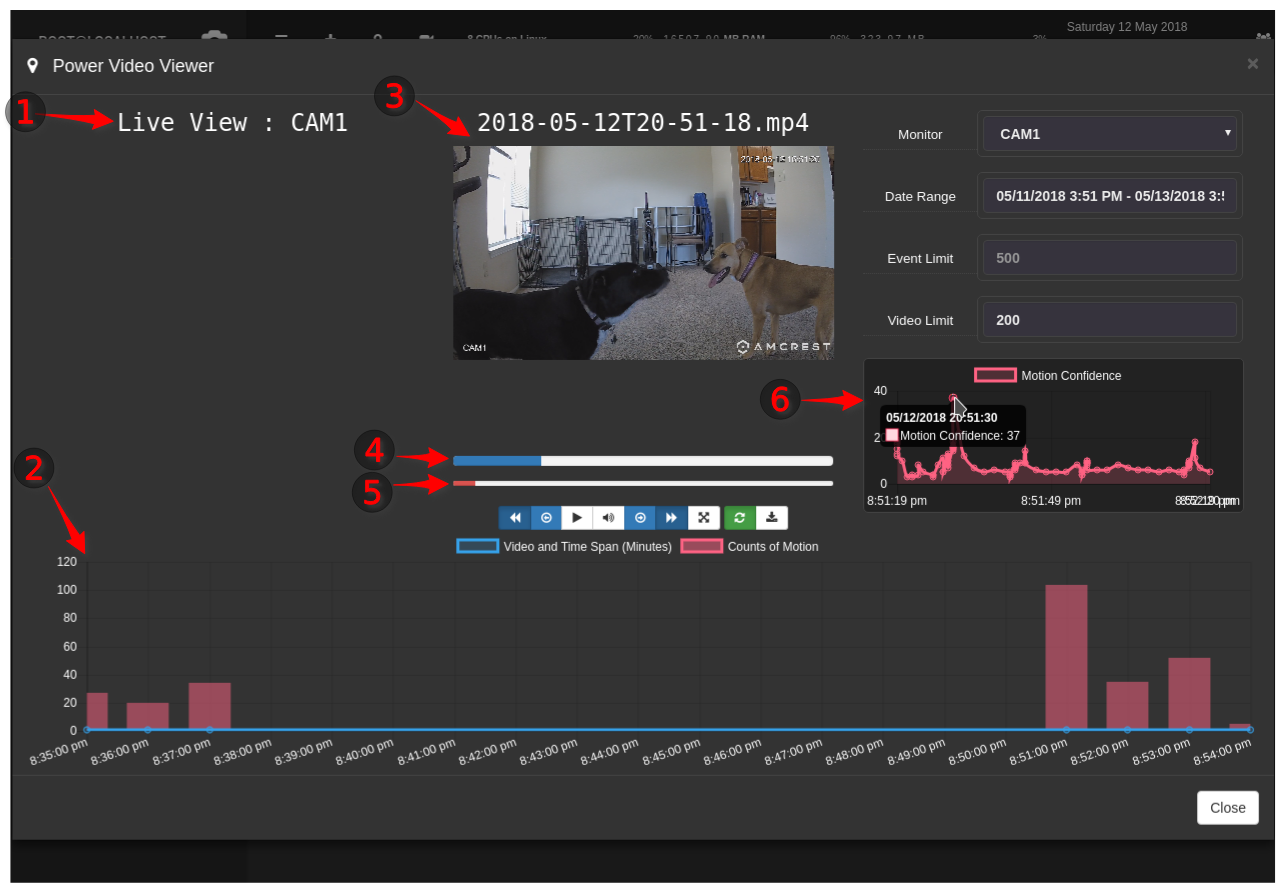
The main elements are:
- Live View - This only worked sporadically for me, and I was unable to get a screenshot of it. When it worked, it showed the live stream from the camera.
- Timeline - A relatively handy view of all recordings and motion events for the specified date range. It seems to default to two days, though I only had the system running and recording for an hour or so. The blue dots along the timeline represent recordings; clicking one of them brings up the recording and starts playing it. The red bars represent the count of motion detection events in each recording.
- Recording - Plays the selected recording along with displaying the filename.
- Playback Timer - It’s a simple playback timer for the currently-playing video. It’s clickable and draggable to advance through the video.
- Motion Meter - The tooltip for this says “Motion Meter”, and the only clear documentation I could find on this says, “When motion occurs a red bar will appear under your stream to indicate how much motion has happened.” Some other documentation implies that this should be the detected indifference value, presumably on a scale of zero to 100, but nothing explains that specifically. This also appeared to lag quite a bit behind the video and doesn’t have a numeric output even on hover.
- Motion Confidence - This is a graph over time (for the currently-playing recording) of “Motion Confidence”. I was unable to find any reference to this in the documentation and haven’t yet received a response to my forum post asking about it. The numeric definitely seems different from the “Motion Meter” to me, but I don’t know what it means.
At this point it seemed like Shinobi was the frontrunner in everything except motion detection, which it seemed to fail horribly at. There’s a Noise Filter setting that I tried, but I couldn’t find any clear documentation on how to tune Shinobi for motion thresholds and it certainly seemed to lack many of the advanced tuning features of motion such as imprinting the number of changed pixels in the frame, debug images/videos with motion highlighted, adaptive thresholds or blob detection. I decided that I might as well explore motion since I understand it and it’s well documented, and come back to Shinobi later if I want to.
Postscript: Some of my other notes on Shinobi:
- One feature I do like about Shinobi is the “Delete Motionless” toggle that apparently records all the time and then deletes recording segments that didn’t have motion detected. This seems like a very good idea and, if done right, could help with capturing the low-motion events leading up to an event that crosses the threshold.
- There were some annoying timezone bugs, where the UI showed the time in my local timezone (including the clock in the upper right corner) but the filenames and Power Viewer were using UTC.
Motion
I’ve used the Motion Project a few times over the years and had a pretty good impression of it - at one point I had it running motion detection with a 1080P webcam on an original Raspberry Pi Model B (700MHz ARM with 512MB RAM). It’s an established project (the git history goes back to 2005, but the initial commit is “initial import”), written in C and highly performant, and follows the Unix philosophy of doing one thing and doing it well. The project has been recently taken over by new developers and has a new home in the Motion-Project GitHub org but the previous maintainer’s amazingly detailed and helpful wiki is still available at http://www.lavrsen.dk/foswiki/bin/view/Motion/WebHome. Also note that I’m not sure about the other projects listed here, but Motion uses luminance / intensity only to detect motion, i.e. no color information.
The main things that I remember about Motion from using it in the past (aside from feeling somewhat archaic though amazingly stable and fast) are:
- Tuning of thresholds as a number of changed pixels.
- For tuning, the ability to output “debug” images showing only the pixels that triggered motion detection.
- Output as videos and/or JPEG snapshots, but it handles everything internally as still frames.
- Ability to mask off certain parts of the frame using a manually-generated mask image.
- Ability to watermark every frame with the number of changes pixels, for debugging/tuning.
- “Lightswitch mode” that automatically ignores massive changes in brightness.
- Motion detection based on the largest contiguous region of changed pixels, so it’s less effected by wind/leaves/rain/etc.
- Support for multiple cameras.
- Snapshots either on a regular interval automatically, or triggered by a signal.
- Ability to execute arbitrary programs/scripts when events occur (many events; motion detect start and end, pictures and movies being written, event start and end, etc.)
- Built-in ability to write extremely detailed information to MySQL/PostgreSQL/SQLite3
- Highly configurable picture/video paths/filenames and overlay of text on images.
Apparently since I last looked at the project, a number of major new features have been introduced including:
- Live streaming of incoming cam video via HTTP MJPEG.
- Motion tracking in the frame, and experimental control of tracking motion via pan/tilt camera controls.
- Control via a simple web interface, even including the ability to change/tune many settings live from the web interface.
- Automatic/adaptive noise and threshold control.
- Official support for both the RaspberryPi and MUSL LibC (i.e. Alpine Linux)
The project also has wonderfully detailed documentation, as well as active IRC and mailing lists.
While Motion only has a very basic web interface for control, there are a number of more full-featured web UIs for it including the quite popular MotionEye that uses Python and Tornado.
Final Choice
After my frustrations with ZoneMinder, Kerberos.io, and Shinobi, I believe I’m going to be going the minimalist route and using Motion with some sort of web UI for motion detection, recording, and review, and the cameras’ built-in RSTP stream for high-resolution live viewing. Given how long this post ended up being, I’ll save the Motion setup and testing for my next installment.
Comments
comments powered by Disqus