I’m going to be moving to a new area at the end of the month and will be leaving my dogs home alone during the days I work in the office - and my home unattended - on a regular basis for the first time. While the neighborhood I’m moving to seems safe, I wanted some peace of mind about both the security of my new home and the well-being of my dogs when I’m out. While I’ve set up a DIY RaspberryPi-based security system in a past apartment, that won’t help knowing that my dogs are doing OK (and the house I’m moving to isn’t wired for a security system). While I may look into setting up a security system in the future (likely based on Z-Wave wireless components), I decided that some IP-based surveillance cameras are the best way to achieve my short-term need. I recently bought some of them, and want to share my experience.
Update: The next post in this series is up, Linux Surveillance Camera Software Evaluation.
Devices and Purchase
I started my search with the hardware compatibility lists of Motion and ZoneMinder, the most well-known (albeit rather aged) open source video motion detection projects. I figured that most likely I’d be using one of these to detect and alert on motion; I’ve used Motion before quite successfully but it is a daemon only whereas ZoneMinder offers a full web interface. The outcome of my research was that most decent modern IP-based surveillance cameras support the ONVIF interoperability standard, and almost any camera that supports ONVIF and third-party clients (i.e. unencrypted video streams) should work.
I decided that I’d get three initial cameras for some tests: an indoor camera with remote pan and tilt to keep an eye on the dogs and two outdoor fixed cameras, one wireless and one wired with Power over Ethernet (PoE) support. I currently have a very good 5GHz wireless access point (a Uniquiti NanoStation M) and a serviceable but nine-year-old 2.4 GHz 802.11b/g Ubiquiti PicoStation 2. Unfortunately, I’ve been unable to find any reasonably-priced 5GHz IP cameras.
My initial desire was to get only 1080p cameras, but I decided to try a 960p wireless model given my aged access point. After a few hours of browsing on Amazon I settled on buying the following three cameras, all of which claimed ONVIF support and support for third-party video management systems:
- SV3C V-B01-1080PL 1080P wired outdoor camera with PoE support
- Amcrest IPM-723W 2.4GHz wireless 960P outdoor camera (shipped with latest firmware,
2.400.AC02.15.R,build:2017-07-31) - Amcrest “ProHD” IP2M-841B 2.4GHz (or wired) 1080p indoor pan/tilt camera (shipped with latest firmware,
2.520.AC00.18.R,build:2017-06-29)
All of them support wired Ethernet in addition to WiFi. They’re all highly reviewed on Amazon with a number of positive reviews mentioning Linux. My choice of the Amcrest cameras was based largely on a number of very positive reviews from other people using Linux and/or leveraging their APIs and on the availability of a detailed HTTP API document on Amcrest’s site. The Amcrest API document specifically mentioned HTTP Basic authentication, which I considered a plus since I could easily add the required headers in an Nginx reverse proxy and use my own authentication methods for remote access.
After unboxing the Amcrest cameras and experimenting with them a bit, I decided to return the SV3C camera unopened. It was clear to me that if I wanted to use Amcrest’s HTTP API, it would make sense to stick with the cameras from one manufacturer. Since SV3C didn’t even have any API documentation that I could find, Amcrest won. The rest of this post will discuss my initial exploration of the Amcrest cameras.
Initial Setup
While Amcrest seemed to be well-reviewed, I’m always very hesitant to put new devices on my network, especially if they’re running opaque proprietary firmware. And even more so if they have “cloud” features (as Amcrest does) that imply remote access which I’d need to trust the manufacturer to properly secure and allow me to disable. Jess Frazelle’s Home Lab blog post, along with some great reviews from my colleague jniesen, spurred me to plan replacing my almost-decade-old Ubiquiti access points with some new ones that support BSSIDs and 802.1q VLANs, but until I do I’m still stuck with a single SSID and flat network.
So, my initial unboxing process for each camera was as follows:
- Plug in to my MacBook with a crossover cable and Wireshark running; power on the camera and record the wired Ethernet MAC address for the camera. Then power off the camera.
- On my VyOS router, assign the camera’s wired MAC a static IP and local DNS.
- Alter my firewall rules to reject all traffic from the camera to the WAN, so it can’t phone home or send anything directly to the external world.
- Plug the camera in to my switch and power it on. Wait a few minutes and then access the builtin HTTP web interface at the IP I assigned.
- Log in with the default username/password (admin/admin) and change the password.
- Browse through the “setup” portion of the UI and record some of the current/default settings and information:
- “Information” -> “Version” - record all versions
- “Camera” -> “Video” - record streaming and snapshot settings; change Overlay to the camera’s hostname and the Sub Stream to MJPEG, VGA, 5 FPS.
- “Camera” -> “Audio” (on ProHD) - record stream information
- “Network” -> “TCP/IP” - change hostname; record wireless MAC; disable P2P
- “Network” -> “Connection” - record all ports; ensure ONVIF authentication is enabled
- “Network” -> (“DDNS”, “IP Filter”, “SMTP”, “UPnP”) - ensure all are disabled
- “Network” -> “SNMP” (if present) - enable v1
- “Network” -> (“Bonjour”, “Multicast”, “802.1x”, “QoS”, “HTTPs”) - ensure all are disabled
- “System” -> “General” -> “Date & Time” - enable NTP
- “System” -> “Export” - export a configuration file and save it.
- “Event” - disable all of them for now
After that, I added the wireless MAC address for the camera to my access point’s ACL and then set up a static IP, local DNS, and outbound traffic reject the same way I did for the wired MAC. I then configured the WiFi connection in the camera’s Setup UI, ensured it connected to the network properly, and unplugged the wired Ethernet.
Chrome App
One thing I noted in the web UI in Chrome is the high-res H.264 video stream was unavailable, displaying a “Please click here to download and install the plug-in” link. I was amazingly happy to find that this link brought me to the Amcrest Web View Chrome App, which actually works with Linux. The Chrome App really just seems to wrap the existing web UI while providing the required plug-in, but it works fine in Chrome on Linux. I’m vaguely concerned about the Chrome App being another data exfiltration or phone-home avenue, but for initial testing I was willing to take that risk. The App worked quite nicely, streaming near-realtime and very fluid, high-FPS images from both the 960P and 1080P cameras over WiFi, and gave me smooth, natural control of the pan and tilt for the ProHD camera.
API and Digest Auth
Next I wanted to dive right into the documented CGI API, and had even prepared a few curl commands for the basics (according to the API document on Amcrest’s site) before I even got the cameras. Unfortunately, they all failed with 401 Unauthorized errors. After some investigation and a trip to the Amcrest Technical Forums, I found that recent firmware versions dropped support for Basic authentication in favor of only Digest. This was confirmed by multiple threads on the forum. This was quite problematic for my plans, since Digest authentication is significantly more complicated than Basic and relies on MD5 hashes generated on the client that include various fields sent in the headers of the server 401 response. In short, there doesn’t seem to be any common reverse proxy (I checked Nginx, Apache, Lighttpd, and HAproxy) that supports Digest authentication to the backend/upstream. So my plans of wrapping the cameras in my own security (TLS and client certificate authentication in Nginx, with Nginx adding the appropriate Basic auth headers during the proxy process) weren’t working out so well - the best I could get is a combination of the authentication I enabled in Nginx, plus Digest authentication to each stream.
I spent the better part of two afternoons and evenings looking into this and trying to develop a workaround. The main Amcrest forum thread about this didn’t have a whole lot of information other than many frustrated customers broken by the latest firmware upgrade (without even a corresponding API documentation update; the latest API docs still listed support for both Basic and Digest) and a few people who received unhelpful support responses. I opened my own support ticket about the problem, stating that I’d purchased the cameras based on the API documentation and planned to integrate them with a system that only supports Basic authentication. I received a response the next day, stating in part:
I am sorry for the bad information you got about our cameras. You are correct, Basic Authentication is no longer supported on our IP Cameras, NVR’s and DVR’s since latest firmware updates.
This was an intended decision as our developer decided to move away from Basic Authentication due to major security concern. Our devices will work only on Digest Authentication from now on. We did suggest our product management team and developers to re-enable Basic Authentication as some sort of “optional” feature able to be disabled by the user. However, this suggestion was dismissed.
The best situation for you at this point is to send back the cameras as, as stated, they won’t work with Basic Authentication.
It’s worth pointing out at this point that the recent firmware versions for these cameras include HTTPS support, and even include support for either uploading your own TLS cert and key or generating a CSR on the camera and then uploading the signed certificate. TLS with Basic auth (i.e. API keys/tokens) is a widely accepted method in the world of public APIs, and would surely be sufficient for devices such as these cameras. In fact, Amcrest runs their own dynamic DNS service for (optional) remote access to cameras, so it should be relatively simple to leverage that and LetsEncrypt for automated certs. Instead - probably spurred on by the archaic ONVIF standard that specifies Digest authentication - they seem to be going the route of alleviating their “major security concern” by means of a 25-year-old authentication system based on MD5 hashes, and likely quite easy to break offline given access to a successful authentication exchange and a GPU-based EC2 instance (not to mention simple to man-in-the-middle).
So, being the obsessive person that I am, I started thinking about how to fix this. I went through the usual suspects for reverse proxying - Nginx, Apache, HAproxy, Lighttpd, etc. - and couldn’t find any examples of existing solutions to handle Digest authentication for the upstream. While it would probably be possible, most of my recent programming experience is in Python and Ruby with a handful of Groovy and JS, and none of those seemed to fit the bill. I spent a bit of time looking at simple HTTP proxy solutions in languages that I know (or at least sort-of know) and found the nodejitsu/node-http-proxy project. With a bit of experimentation I was able to get that working for the simple text-based API URLs but (as expected, looking at the source) it failed completely for the secondary MJPEG streams. I found and tried node-mjpeg-proxy next, but was unable to get it working satisfactorily.
After all of those experiments and research I decided that I should stop looking for an exsiting solution or magic bullet and go back to what I know best: Python. After only a few minutes more on Google, I stumbled on a complete gem in the form of a Flask snippet, Stream Proxy with Requests:
# -*- coding: utf-8 -*-

from flask import Flask
from flask import Response
from flask import stream_with_context

import requests

app = Flask(__name__)

@app.route('/<path:url>')
def home(url):
    req = requests.get(url, stream = True)
    return Response(stream_with_context(req.iter_content()), content_type = req.headers['content-type'])

if __name__ == '__main__':
    app.run()
Python Digest-Auth-Removing Proxy
Starting with the above snippet using Flask and requests - two Python packages that I’m quite familiar with - I was able to quickly add the Digest authentication option to the requests call and achieve a working, auth-less MJPEG stream from the camera. With a bit of tuning, I came up with a rough proof-of-concept that provided unauthenticated access to the MJPEG stream and CGI-based API (including snapshots and PTZ control) simultaneously via multiple workers. It’s not amazing; running on my desktop the MJPEG stream suffers some pretty bad latency that gets even worse when other CGI API endpoints are used simultaneously (I suspect this may be a problem on the camera itself).
Note that this does not proxy either non-MJPEG streams (i.e. the high-resolution RSTP stream) or the built-in web UI itself (which relies on client-side javascript XMLHttpRequest and cookies for login).
For the time being I’m not sure if I’m even going to use this proxy, but for anyone who’s interested, the code is on GitHub along with a ready-to-run Docker image.
JSON Configuration Backups
While looking into the Digest authentication changes, I used the configuration export/backup functionality (Export via the Setup web UI, or /cgi-bin/Config.backup?action=All via the API for a more detailed config) to see if there was a chance that Digest/Basic was hidden somewhere in the config. It’s not, but I was pleasantly surprised to see that the exported configuration file was plain and cleanly-deserializable JSON (even pretty-printed). This definitely makes it easier to back up configuration to a git repository and track changes over time, or make sweeping changes to defaults for provisioning new cameras.
API
For the majority of the last five-plus years of my career, I’ve worked almost exclusively with software and generally with modern, well-known systems and services. Coming from a ReST-ful world, the Amcrest cameras’ API was a bit of a shock and trip back in time for me. While the current version (2.12) of the API documentation calls it a “HTTP API”, the filename of the previous version that I found (1.51) is much more accurate: AMCREST_CGI_SDK_API.pdf. While functional, the API appears to be a minimum-effort project to wrap (likely existing) system tooling on the camera in some sort of HTTP API. Some pertinent pieces of the API specification include:
- Aside from RSTP streams, all paths are to CGI scripts - i.e.
/cgi-bin/mjpg/video.cgi,/cgi-bin/configManager.cgi, etc. - Many of the paths use query parameters that sound like they map to command-line arguments, i.e.
/cgi-bin/configManager.cgi?action=getConfig&name=Snap. - While the API specification defines HTTP status codes including 200, 400, 404, and 500, it also clearly states (with examples) that “fits with syntax but an error occurs while the server handles it” will result in a HTTP 200 with a body containing a plain text error message.
- The API appears to use the POST verb for anything that uploads a file, and GET for everything else. URLs that result in configuration changes or pan/tilt/zoom commands are still GET requests.
- For query parameters (which drive the majority of the API), various CGI paths use either logically-named parameters (e.g. “channel”, “action”, etc.) or generic ones (“arg1”, “arg2”, “arg3”, etc.).
- While the JSON configuration file format was a welcome surprise, API endpoints that return textual responses (as opposed to image/video/audio) respond with line-based key/value pairs separated by equal signs.
I imagine that much of this is dictated by needing to support Amcrest’s network video recorder products, and perhaps some of it is also dictated by their manufacturer Dahua (Amcrest’s products seem to be running customized and branded Dahua software, and likely hardware too). While much of this API is simpler for me to work with than the SOAP- and WSDL-based ONVIF standard, I’d still be much happier if the devices exposed a modern ReST/JSON API.
There is a Python package, python-amcrest, that claims to provide a native Python client for this CGI API but I haven’t tried it yet.
Alarms / Events - Initial Research
These cameras support a number of internal “alarms” for events such as motion detection (likely nowhere near as good as Motion or ZoneMinder), video loss, audio detection, failed logins, disk (optional SD card) missing, error or full, network disconnect or IP conflict, or external alarms (the ProHD has four analog relay input/output connections on the back that can be used for either external trigger inputs or outputs). I’m not concerned with most of them and currently don’t have SD cards in the cameras, but I am interested in the “Video Tamper” alarm that detects loss of picture such as when the lens is obstructed. So, I began a bit of research into what options were available for receiving these alarms. Of course I wasn’t lucky enough to see a webhook or HTTP GET/POST delivery method, let alone SNS or SQS. The options for alarm handling are recording, triggering one of the relays (on the ProHD that supports them), taking a snapshot, sending email, or polling the API for alarm events. The ProHD also supposedly supports SNMP traps, though they’re not explicitly listed as an event action.
Update: Upon review of the API documentation, it appears that it’s also possible to “subscribe” to events via HTTP/CGI. This API appears to be a HTTP GET that responds with a multipart/x-mixed-replace content-type and streams plaintext event descriptions to the client as they occur. The client must send keepalive data to the server every 1 to 60 seconds (helpfully, the doc states that the keepalive data can be the string “keep alive”).
Given those options, I decided that either SNMP or “email” (SMTP) would be the best bet for programmatically receiving the events and acting on them.
SNMP
The latest firmware for the IPM-723W, “15.R”, doesn’t appear to support SNMP at all; it’s missing the “Setup” -> “Network” -> “SNMP” configuration that the ProHD running “18.R” software has. So it seems like SNMP isn’t going to be a viable option for me but I wanted to explore it anyway. I enabled SNMP v1 with the default “public” read community and issued a quick snmpwalk. There wasn’t a whole lot aside from what I’d expect to find on a typical Linux device (SNMP*-MIB, IF-MIB, TCP-MIB, IP-MIB, etc.). The sum of the interesting parts was:
SNMPv2-MIB::sysORID.10 = OID: SNMPv2-SMI::enterprises.1004849.2.1.1
SNMPv2-MIB::sysORID.11 = OID: SNMPv2-SMI::enterprises.1004849.2.1.2
SNMPv2-MIB::sysORID.12 = OID: SNMPv2-SMI::enterprises.1004849.2.1
SNMPv2-MIB::sysORID.13 = OID: SNMPv2-SMI::enterprises.1004849.2.2.1
SNMPv2-MIB::sysORID.14 = OID: SNMPv2-SMI::enterprises.1004849.2.2.2
SNMPv2-MIB::sysORID.15 = OID: ccitt.1
SNMPv2-MIB::sysORID.16 = OID: ccitt.1
SNMPv2-MIB::sysORID.17 = OID: ccitt.1
SNMPv2-MIB::sysORID.18 = OID: ccitt.1
SNMPv2-MIB::sysORID.19 = OID: ccitt.1
SNMPv2-MIB::sysORID.20 = OID: ccitt.1
SNMPv2-MIB::sysORID.21 = OID: ccitt.1
SNMPv2-MIB::sysORID.22 = OID: ccitt.1
SNMPv2-MIB::sysORID.23 = OID: ccitt.1
SNMPv2-MIB::sysORID.24 = OID: ccitt.1
SNMPv2-MIB::sysORID.25 = OID: ccitt.1
SNMPv2-MIB::sysORDescr.10 = STRING: Dahua SNMP Mib Module -- System oidVersionInfo
SNMPv2-MIB::sysORDescr.11 = STRING: Dahua SNMP Mib Module -- System oidProductInfo
SNMPv2-MIB::sysORDescr.12 = STRING: Dahua SNMP Mib Module -- System oidSysetmInfo
SNMPv2-MIB::sysORDescr.13 = STRING: Dahua SNMP Mib Module -- network oidNetworkPort
SNMPv2-MIB::sysORDescr.14 = STRING: Dahua SNMP Mib Module -- network oidTcpIpInfo
SNMPv2-MIB::sysORDescr.15 = STRING: RegularStreamInfoTable
SNMPv2-MIB::sysORDescr.16 = STRING: MDStreamInfoTable
SNMPv2-MIB::sysORDescr.17 = STRING: AlarmStreamInfoTable
SNMPv2-MIB::sysORDescr.18 = STRING: Extra1StreamInfoTable
SNMPv2-MIB::sysORDescr.19 = STRING: VideoMotionInfoTable
SNMPv2-MIB::sysORDescr.20 = STRING: VideoLossInfoTable
SNMPv2-MIB::sysORDescr.21 = STRING: VideoBlindInfoTable
SNMPv2-MIB::sysORDescr.22 = STRING: LocalAlarmInfoTable
SNMPv2-MIB::sysORDescr.23 = STRING: NetworkAlarmTable
SNMPv2-MIB::sysORDescr.24 = STRING: RecordMainStreamInfoTable
SNMPv2-MIB::sysORDescr.25 = STRING: PhysicalVolumeInfoTable
It appears that there are two sets of custom MIBs exposed, one from their manufacturer Dahua and another presumably from Amcrest and claiming to be exposed at “.0.1” (ccitt.1). I’ve been completely unable to get anything out of the Amcrest MIBs (sysORID’s 15 through 25; ccitt.1) and have presumed them to be broken; the one thread on the Amcrest forums about this seems to concur. For the Dahua OIDs, neither Amcrest nor Dahua appear to publish the MIBs but thanks to a LibreNMS issue, IPcamTalk forum thread and reddit post I was able to find them. The information I got from walking that OID tree with the appropriate MIB from those links didn’t prove terribly useful:
DAHUA-SNMP-MIB::softwareRevision.0 = STRING: 2.520.AC00.18.R
DAHUA-SNMP-MIB::hardwareRevision.0 = STRING: 1.00
DAHUA-SNMP-MIB::videoChannel.0 = INTEGER: 0
DAHUA-SNMP-MIB::alarmInput.0 = INTEGER: 1
DAHUA-SNMP-MIB::alarmOutput.0 = INTEGER: 1
DAHUA-SNMP-MIB::serialNumber.0 = STRING: AMC00056485D24AAF8
DAHUA-SNMP-MIB::systemVersion.0 = STRING: 2.520.0000.18, Build Date:2017-06-29
DAHUA-SNMP-MIB::deviceType.0 = STRING: IP2M-841B
DAHUA-SNMP-MIB::deviceClass.0 = STRING: IPC
DAHUA-SNMP-MIB::deviceStatus.0 = INTEGER: 1
DAHUA-SNMP-MIB::machineName.0 = STRING: AMC00056_24AAF8
DAHUA-SNMP-MIB::cpuUsage.0 = INTEGER: 70
DAHUA-SNMP-MIB::lastestEvent.0 = STRING: videoBlindEvent
DAHUA-SNMP-MIB::encodeNo.0 = INTEGER: 0
DAHUA-SNMP-MIB::tcpPort.0 = INTEGER: 37777
DAHUA-SNMP-MIB::udpPort.0 = INTEGER: 37778
DAHUA-SNMP-MIB::httpPort.0 = INTEGER: 80
DAHUA-SNMP-MIB::rtspPort.0 = INTEGER: 554
DAHUA-SNMP-MIB::maxConnectNum.0 = INTEGER: 10
DAHUA-SNMP-MIB::httpsPort.0 = INTEGER: 443
DAHUA-SNMP-MIB::getIpmode.0 = INTEGER: 0
DAHUA-SNMP-MIB::macAddr.0 = STRING: 9c:8e:cd:xx:xx:xx
DAHUA-SNMP-MIB::ipVersion.0 = INTEGER: 0
DAHUA-SNMP-MIB::subnetMast.0 = STRING: 255.255.255.0
DAHUA-SNMP-MIB::defaultGateway.0 = STRING: 192.168.0.1
DAHUA-SNMP-MIB::preferredDns.0 = STRING: 192.168.0.1
DAHUA-SNMP-MIB::alternateDns.0 = STRING: 1.0.0.1
DAHUA-SNMP-MIB::ipAddr.0 = STRING: 192.168.0.60
DAHUA-SNMP-MIB::localAlarmIndex.1 = INTEGER: 1
DAHUA-SNMP-MIB::networkAlarmIndex.1 = INTEGER: 1
So… nothing terribly interesting. I’m planning on seeing what I can get from the SNMP traps, but since only one of my cameras supports them (and they’re UDP) I’m not planning on using them for actually receiving events/alarms.
SMTP
With SNMP out of the running for receiving alarms, I turned to SMTP. The configuration page I was greeted with, as well as its pop-up help page, left me slightly confused and unsettled:
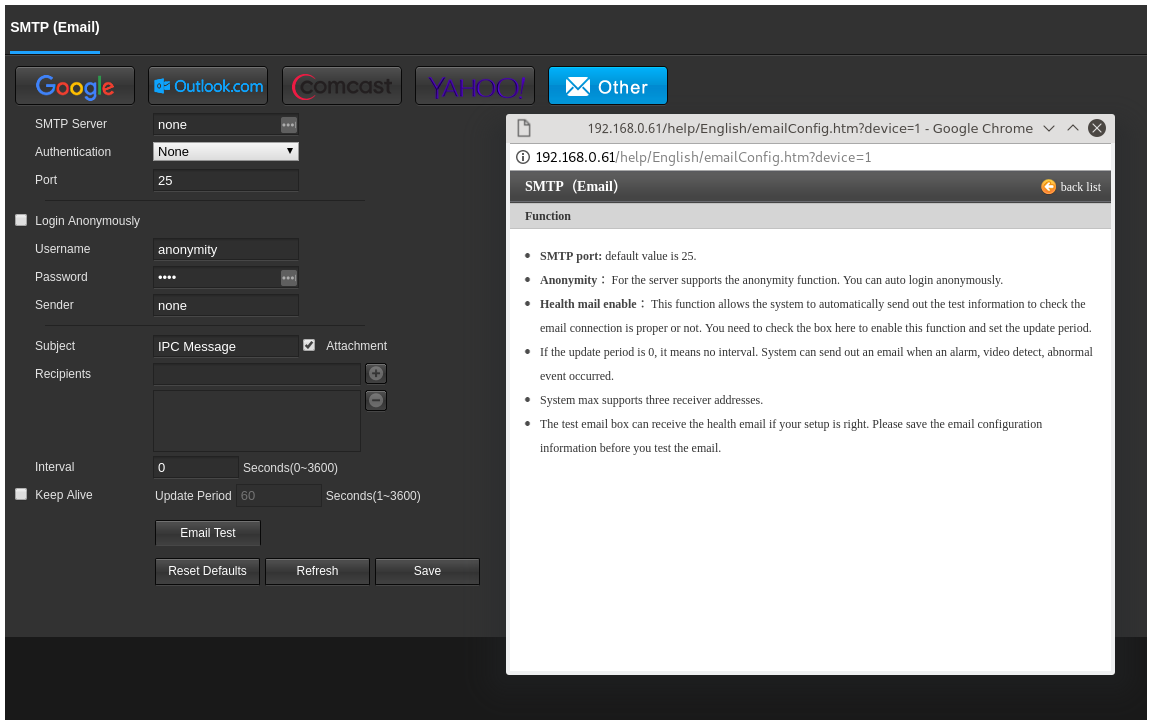
When I finally muddled through the options and poor translation - checking the “Login Anonymously” checkbox directly above the SMTP username and password actually enables authentication, i.e. disables non-AUTH/anonymous SMTP - I found that support for anonymous SMTP (i.e. without AUTH) is completely broken. When setting unchecking the “Login anonymously” box (i.e. no AUTH), the UI displays the same “Email test failed” error message as with bad credentials, but (per Wireshark/tcpdump) it never actually sends any traffic to the SMTP server at all. I found a forum thread going back almost two years confirming this.
I quickly hacked together a SMTP server that accepts any credentials and prints the message to STDOUT (based on secure-smtpd), pointed the camera’s SMTP settings to it, and then threw a black shirt over the lens of the camera. Within a minute or so, I got the following message via my dummy SMTP server:
Date: Sun, 06 May 2018 15:28:45 -0600
From: <>
To: <jason@jasonantman.com>
Subject: =?UTF-8?B?SVBDIE1lc3NhZ2U=?=
MIME-Version: 1.0
Content-type: multipart/mixed;boundary="======DAHUA_TECH======"

This is a multi-part message in MIME format.

--======DAHUA_TECH======
Content-Type: text/plain;
        charset=UTF-8
Content-Transfer-Encoding: base64

QWxhcm0gRXZlbnQ6IFRhbXBlciBEZXRlY3QNCkFsYXJtIElucHV0IENoYW5uZWw6IDENCkFsYXJt
IFN0YXJ0IFRpbWUoRC9NL1kgSDpNOlMpOiAwNi8wNS8yMDE4IDE1OjI4OjQwDQpBbGFybSBEZXZp
Y2UgTmFtZTogQU1DMDAwNTZfMjRBQUY4DQpBbGFybSBOYW1lOiANCklQIEFkZHJlc3M6IDE5Mi4x
NjguMC42MA0K


--======DAHUA_TECH======
Content-Type: application/octet-stream;
        name="20180506152840423ch01.jpg"
Content-Disposition: attachment;
        filename="20180506152840423ch01.jpg"
Content-Transfer-Encoding: base64
...
The second attachment is a full 1920x1080 snapshot of the video. I was a bit confused to see the UTF-8 base64-encoded subject, but the base64-decoded Subject is “IPC Message” and body text is:
Alarm Event: Tamper Detect
Alarm Input Channel: 1
Alarm Start Time(D/M/Y H:M:S): 06/05/2018 15:28:40
Alarm Device Name: AMC00056_24AAF8
Alarm Name:
IP Address: 192.168.0.60
Since the only alarm/event I really care about is loss of picture, and motion detection software should be able to handle the same task, I’m going to completely ignore the alarm/event features for now and focus on the camera solely as a video source.
System logs
The cameras keep rudimentary “system logs” which include events (e.g. video tamper/video loss) as well as login/logout from the web UI as well as API, configuration saves, and “Set Time” events which perplex me as they show web UI client IPs as the source. These logs are available via a searchable table in the web UI, as well as CGI access to either page through logs filtered by date/time or return a “log backup” file of all logs between a given start and end time. Unfortunately, they don’t support syslog or any other remote log aggregation.
GPL Compliance
Between the SNMP output and nmap results, as well as some other information exposed in the documentation and user interface, I’m certain that these devices are running Linux and FFmpeg (LGPLv2). I’ve also seen some things that make it highly likely that they’re also running busybox (GPLv2) and the other common embedded Linux utilities. However, I was unable to find any open source license information or source code offer in the packaging and printed documentation that came with either camera, or on Amcrest’s website or user documentation. I’ve posted a thread in Amcrest’s technical discussion forums inquiring about this but don’t expect much response from them. If I have time, I may try downloading one of the firmware images and doing some simple tests like running it through strings to see if I can spot any well-known copyright headers. But as far as I can tell,
Auto Maintain
The cameras both came out-of-the-box with the “Auto maintain” feature enabled, which… reboots the cameras automatically once a week. By default, on Thursday mornings just after 3am local.
Having spent some time in the past developing embedded Linux network devices, this does not give me a terribly confident feeling about the software.
Status and Next Steps
To wrap up, I currently have two Amcrest IP cameras running on my home network; one looking out the front window, and one (indoor pan/tilt) overlooking my dogs’ crates. Now that I have them configured for the basics, I’m going to attempt to ignore Amcrest’s irritating software and focus on the cameras solely as video sources. My next steps - hopefully in a follow-up post not too long from now - will include:
- Evaluation of Linux-based video surveillance recording/streaming/motion detection software, and choosing one to use. This will likely come down to choosing between something with an existing multi-camera web interface (ZoneMinder, or perhaps one of the newer variants) or something to handle motion detection only (Motion, or a modern variant) and cobbling together a simple web UI for streaming and event viewing.
- Experimenting with using ONVIF instead of the CGI interface.
- Expermenting with FFmpeg or something else to restream the video instead of trying to remove authentication in a proxy.
- Possibly using python-amcrest as a wrapper around the CGI interface.
- Figuring out a system to notify me of important events such as motion, video loss, or connectivity loss to a camera.
- The cameras support SD cards and a built-in simple DVR feature. I may get cards for them and configure them to record on network connection loss, just as a test.
Update: The next post in this series is up, Linux Surveillance Camera Software Evaluation.
Comments
comments powered by Disqus